Showing posts with label Studio Brief 1 404. Show all posts

Friday, 19 February 2016

How Do You Read? Final Print

Final Print


compared to last test print


Pages Inside
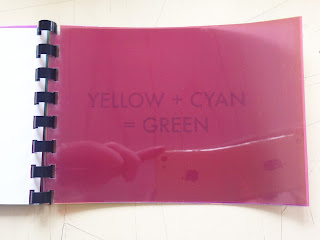
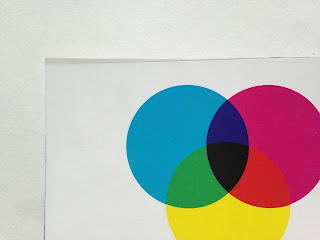
The overlapped acetate used to create the colours seen below, the only colours of acetate used are Magenta, Yellow and Cyan. This then uses subtractive colour system to create the colours seen as the mixture of acetate layer over lap in different orders.
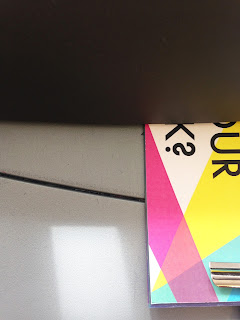
The lines seen on this photos are the reflection of the camera, no page has a line of missing ink or cut across (at the moment), To reduce the amount of dust and muck that stuck to my test print i have kept this copy in a plastic bag at all times, cut it in the studio where there is less paper dust than the print room, touched the pages as little as possible, cut it using a hand scapula touching the dry side only, keep the cutting as quick as possible with as little lines as i could (lines cause more touching which lead to finger prints) and let it dry in print for 24 hours before cutting the acetate.    

Pages in the Correct Order
This shows how the layer overlap, a page is turned every next picture


How do You Read? Final Binding

Final Binding 

As the concept behind this book is that it a flip book for children where they can easily overlap combination of the CMY colour scheme to see how printed use this in print to produce the vast range of colour systems the binding for the book needed to be the easiest to flip though the pages, it needed to show the whole page and allow the audience to see the pages overlapping but do this themselves. Because of this and because the book in the research showed this method i have used spiral bound/ring bounding for this book.

Spiral Binding, also known as Coil Binding, is a common method for joining the pages and cover of a bound document.
It utilizes a durable plastic or metal coil that is inserted and twisted through small holes punched along the spinal edge of the book’s cover and pages. The coil joins the pages and cover as an assembly, yet still allows them to open freely.   

The Advantages of Spiral Binding…
- The pages can be opened a full 360 degrees. 
-The pages turn easily and stay put.

- It can accommodate low page counts or high page counts.


After the using the guillotine for the first copy of this book and finding that it didn't cut the acetate properly, and also was very hard to get even cut for all the pages as when the page was cut it removed the crop marks therefore the last cut was a guess for the final version of my book i have cut it using aa scapula and metal ruler. this allowed me to cut perfectly along the crop marks, this made the shape of the paper pages perfectly even and cut correctly. I then used these as stencil to cut the acetate with the same medium, this was harder as the acetate was harder to cut so took more pressure and bend sometimes when i was trying to cut them but his couldn't be avoided at the cellophane material i looked at feel a part when cut, this material even if slightly uneven is still more useful for this book.
Scapula and metal rule is the best way to cut pages with crop marks


When binding this book i used a book clipper to keep the pages in the correctly page so when the hole punch punched the holes for the binding they were all even which meant to book could be bound more identically so the edges of the book are more even.   


After the first print bounding failed due to the book being to thick to be bound at once  for this print i have sectioned off the book into two halves and will cut these and different times but lined up against the marks on the whole punch to make sure the hole punches are accurate and line up.


first half hole punched


  second half hole punched 


Overall after testing this binding method 3 time before the final print which was no planned so took time it was worth it as i learnt how to use the machine properly and how to make sure the binding lined up, how much to put though at once. Because of the test binding the final bounding of this book is quite good, its even and keeps the pages flipable as it is lined up correctly, the hole are fully cut out due to sectioning of the book before the hole punch.  

Friday, 12 February 2016

How Do You Read? Print 3

Print 3, on Acetate Again 

For this print the printed acetate was used again, this was as the cellophane was impossible to use and the acetate was also more suitable for the brief. This book pages fell out of the printer when it finished printing them, this created marks on the ink and even cause it to rub off in some places. Also because the sheets hit the floor whilst wet they picked up much and dust from the floor which cant be removed from the pages. After this happened it was clear the book would need to be reprinted again but the book was used to text binding in two section incase this messed up the next print. The pages where separated into halves then clipped together with book clippers to be bound, there is a line along the hole punch machine which the pages where lined up against (to make sure both set of whole were even) then it punch separately. This created a even holes on all pages and the whole punch worked fine on this thickness of material so could be bound perfectly, this informed the binding of the next book.


uneven cut due to guillotine use, will cut by hand for next book

page showing the dust marks collected on the page


This print also got a mark on it whilst it was being bound as the machine has ink on but i didn't see it, i will clean the machine before using it for the next print


After all the pages weren't even as they had been cut unevenly i tried to even the line sup using a guillotine, as the book was too thick to be cut like this it ending up bending the back page and created an uneven cut line that can be seem on the front page. To avoid this next time i will not use a guillotine at all and make sure i cut all the pages separately by hand.


As the pages got dust on them on one page i tried to wipe it of using water, this reacted with the ink and wiped the ink off too. This made the pages have an uneven cover and gave a unprofessional messy look therefore the dust cant be removed but i will take step in the next print to reduce the amount of dust around the final print, i will cut it on a surface away from digital print and will clean the surface before use, i will also leave the ink for longer to dry before touching it.

Sunday, 7 February 2016

How Do You Read? Print 2

Print Book using Cellophane 


Print 2
Since the acetate causes issues in the last print, this book was created using coloured cellophane for the pages. This was to make the book thiner so it could be bound correctly. This causes issues as the cellophane was even harder to cut evenly, the material isn't very durable so ripped very easily whilst being cut which lead to never edges, this gave the book and unprofessional, unfinished feel. This wasn't the only issue with this material, once bound edge of the cellophane between the binding ripped just to the thinness of the material and the pages instantly fell out once bound therefore could be submitted.


These images how how the page feel out when the book was bound due to the thinness of the material strip left between the binding and the edge, to avoid this next time i will use the acetate again like the first test as this allowed the pages to stay in place and not fall out unlike this test. 


As the cellophane was very thin it was very hard to cut, it was ripped by the scissors/scapula/guillotine when it was tried to avoid this i tried to add masking tap to the edges to give the a large thickness before they where cut. This worked as it allowed the edges to be cut straight without the cellophane ripping till the tape was removed, then it was very difficult to remove it without ripping the material, some of the pages has rips along the edges which gave the book and unprofessional scruff look that seem in appealing. Also this shows how easily a child could rip this material this makes it suitable for a book for children.  

Monday, 1 February 2016

How Do You Read? Test Print


First Acetate Example 

Print 1

This test uses print acetate for the coloured pages as this was the most successful material in the experiments but once it was printed it was cut using a guillotine which couldn't cut through the paper since they are thicker than paper but it bent them so book over all size had to be reduced to remove the cutting marks. When this book was bound it was put under the hole punch machine as a full book, this was done to make sure all the pages alined with the same holes so that it could be bound equally but the machine couldn't cut this thickness of material so it cut the whole diagonally. Having the holes diagonally mean that the book wasn't bound correctly as the edges of the bottom whole where too close to the edge, the book therefore fell apart soon.


Thursday, 14 January 2016

How Do You Read?Stock

Stock 

Most of the pages in this book will be printed on to acetate but the cover, break pages (white pages inside the book ti break up the combinations and explain the mix) and the back page will be printed on to white paper stock. White is being used as this will highlight the colour combination the best as this is the colour that CMYK is based around being printed on, white is the base for the colour system to work therefore is the break pages to highlight how the colours will be produced in the best way

Always shown on a white background to enhance the colour combination.
So for the white pages i have done a few different test to see which stock works best for the book, the important feature need to be that it being produced for children so it will need to be durable as possible as this means the child cant break it easily but also the book is being ring bound so it need to be thick but able to be hole punched for the ring bound to go through.

first test


second test after result of the first, fixing the issues


final stock choice
360 GSM GLOSSY PAPER